How to use CloudFormation to deploy Frontend Apps to S3 and Serverless Application Repository
Update: 2020-02-20: version 2.4.2 - Deployment directly from SAR embedded resources, documented substitutions
If you ever wanted to automatically deploy front-end web applications along with CloudFormation resources, here is how to do that. You no longer need to deploy a SPA app or a static website separately from the back-end. Just do it all together with standard sam deploy or aws cloudformation deploy commands.
We built and opensourced a custom CloudFormation resource that can manage file uploads to S3, even substituting variables in web pages when uploading to allow you to configure single-page apps and web sites with dynamic parameters during deployment. The layer is easy to use in SAM and Cloudformation templates, even for beginners. The project is available under the MIT license. You can get the source code from the GitHub repository, or deploy it directly from the Serverless Application Repository.
We also published an example project that demonstrates how to package and deploy a web site using this custom Cloudformation resource.
Note: previous versions of this page included a public layer deployed to us-east-1; the layer is still available, but we now discourage using it directly. Use the SAR resource, as explained below, to deploy everything in your account and not depend on any third-party resources. You can also use the SAR resource in any supported AWS region, unlike the public layer which can only be used in `us-east-1.
How it works
The standard S3 resources in CloudFormation are used only to create and configure buckets, so you can’t use them to upload files. But CloudFormation can automatically version and upload Lambda function code, so we can trick it to pack front-end files by creating a Lambda function and point to web site assets as its source code.
That Lambda, of course, won’t really be able to run, because it contains just the web site files. This is where our layer comes in. When you attach it to the Lambda function, it will make it executable. Running the Lambda function will upload the source code to an S3 bucket.
The only thing left is to ensure that the function is invoked during a CloudFormation stack deployment. We can do that by creating a custom resource linked to a Lambda function. The layer we created is intended to run in this mode, so it automatically supports CloudFormation custom resource workflows. With the custom resource, you can configure the upload parameters, such as the target bucket, access control lists and caching properties, so it’s easy to create web sites.
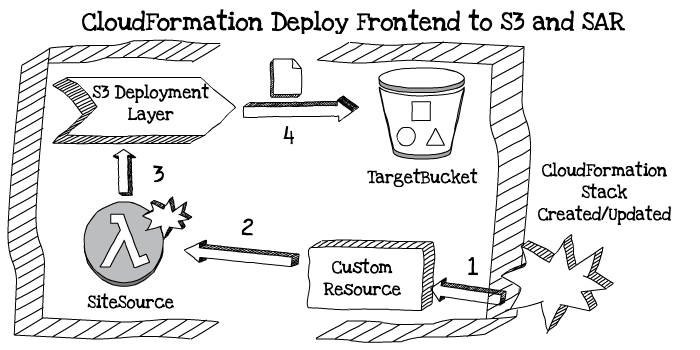
Cloudformation usually updates custom resources only when their parameters change, not when the underlying Lambda function changes. Because we’re using the web site assets as the source of the Lambda function, we need to additionally ensure that any changes to those assets automatically trigger the update. To do that, we’ll make SAM publish a new named version of the Lambda function with each update of the site assets, using the AutoPublishAlias flag. We now get an automatically incrementing number whenever asset files change, so we can add that version as a parameter of the custom resource, and CloudFormation will trigger the function and upload the changed files automatically.
How to use this in your web application
Deploying the layer
First, deploy the layer. There are three options for deploying the supporting layer in your account:
- Deploy it from source code, using
make deploy. Check out the Deployment from Source section in the GitHub repository README for more information. - Deploy it from the Serverless Application Repository web console, then note the Layer ARN in the stack outputs.
- Deploy it as a nested stack directly from a CloudFormation template, by including the following snippet in the template resources:
DeploymentLayer:
  Type: AWS::Serverless::Application
  Properties:
    Location:
      ApplicationId: arn:aws:serverlessrepo:us-east-1:375983427419:applications/deploy-to-s3
      SemanticVersion: 2.4.2
You can then use !GetAtt DeploymentLayer.Outputs.Arn to retrieve the Layer ARN.
Packaging the web site files with CloudFormation
Add an AWS::Serverless::Function resource and as its Properties add:
- the
Layerproperty pointing to layer ARN, CodeUri, pointing to a folder inside the project (for exampleweb-site), containing the frontend files,- set the
Runtimetopython3.6orpython3.7, because the layer is using it, and, - set the
Handlerpointing todeployer.resource_handler(this comes from the layer), - the
Timeoutset to long enough to upload the files (600means 10 minutes) - add
Policiesto allow the function to upload to your target bucket (for example, usingS3FullAccessPolicy) - Set an
AutoPublishAliasproperty to something. This will generate a new version of the Lambda and make it available as a retrievable property on every CloudFormation deployment.
Here is an example:
SiteSource:
  Type: AWS::Serverless::Function
  Properties:
    Layers:
      - !GetAtt DeploymentLayer.Outputs.Arn
    CodeUri: web-site/
    AutoPublishAlias: live
    Runtime: python3.6
    Handler: deployer.resource_handler
    Timeout: 600
    Policies:
      - S3FullAccessPolicy:
          BucketName: !Ref TargetBucket
Triggering the upload during CloudFormation deployment
Define an AWS::CloudFormation::CustomResource. Set its Properties to have:
- a
ServiceTokenwhich takes theArnattribute from the site source function you created in the previous step, - a
Versionproperty referencing a string variable"SiteSource.Version”, - a
TargetBucketproperty referencing a the target bucket, - property
Aclset to a pre-canned S3 access policy. For example,public-readfor publicly accessible web sites and, - the
CacheControlMaxAgeset to 600.
Here is an example:
DeploymentResource:
  Type: AWS::CloudFormation::CustomResource
  Properties:
    ServiceToken: !GetAtt SiteSource.Arn
    Version: !Ref "SiteSource.Version"
    TargetBucket: !Ref TargetBucket
    Acl: 'public-read'
    CacheControlMaxAge: 600
Applying substitutions
Static web sites often need to refer to other resources within the stack, such as API URLs, Lambda function ARNs and other buckets. The deployment resource can optionally substitute variables in files while copying them to S3 with values you can assign directly in the template. To do so, mark the variables with ${} in the files (for example, to add a variable called APP_NAME, use ${APP_NAME}). Then, set up the values in the Substitutions property of the custom resource. The property has two sub-keys:
FilePattern: a standard shell pattern for files to processValues: a key-value map of variable names and substitutions
Here is an example:
DeploymentResource:
  Type: AWS::CloudFormation::CustomResource
  Properties:
    ServiceToken: !GetAtt SiteSource.Arn
    Version: !Ref "SiteSource.Version"
    TargetBucket: !Ref TargetBucket
    Acl: 'public-read'
    CacheControlMaxAge: 600
    Substitutions:
      FilePattern: "*.html"
      Values:
        APP_NAME: 'Example Application'
        STACK_ID: !Ref AWS::StackId
For the full template source code, check out the example project.
Publishing Frontend Apps to AWS Serverless Application Repository
The biggest benefit of this stack is that it allows you to publish your frontend applications or components to the AWS Serverless Application Repository (SAR, from now on). Previously, it was very hard to deploy any SPAs, static websites or even frontend components to SAR. Just before Re:Invent 2018, AWS announced support for CloudFormation Custom Resources, allowing you to extend Cloudformation. Using that, our stack allows you to deploy any kind of React.js, Vue.js, Angular or any kind of frontend, and combine it with your backend stacks too. Additionally, using them as Nested Applications, you can combine them with other published serverless applications that are available on Serverless Application Repository.
You can also see this example in the Github repository /example folder by clicking here.
You can just use the usual SAM or Cloudformation deployment commands to create this stack on AWS.